
Jump To Section
Most people know they should keep an eye on their moles, but many aren’t sure what they should actually be looking for or how often they should check. Skin cancer can affect anyone, and changes are not always obvious or painful in the early stages. That’s why regular at-home mole checks can play an important role in spotting changes sooner and seeking professional advice when needed.
At Freyja Medical, our dermatology-led team regularly sees patients who are unsure whether a mole or skin lesion is concerning. While regular at-home mole checks are an important way to monitor for changes between appointments, they should not replace professional skin assessments. We generally recommend annual professional mole checks alongside regular at-home monitoring throughout the year. To help patients feel more confident checking their skin at home, we’ve created a free downloadable At-Home Mole Check Guide packed with practical advice and step-by-step guidance.
Why Are At-Home Mole Checks Important?
Getting familiar with your skin helps you recognise when something changes. Many skin cancers, including melanoma, are more treatable when identified early, which is why regular skin awareness is so important.
An at-home mole check does not replace a professional assessment, but it can help you:
- Become familiar with your normal moles and skin markings
- Spot new or changing lesions earlier
- Monitor areas that may be difficult to notice day-to-day
- Know when it may be time to seek expert advice
Many people assume a dangerous mole will always look dramatic or feel painful, but this is not always the case. Some skin cancers can develop subtly over time, making regular monitoring especially important.
What Should You Look For During a Mole Check?
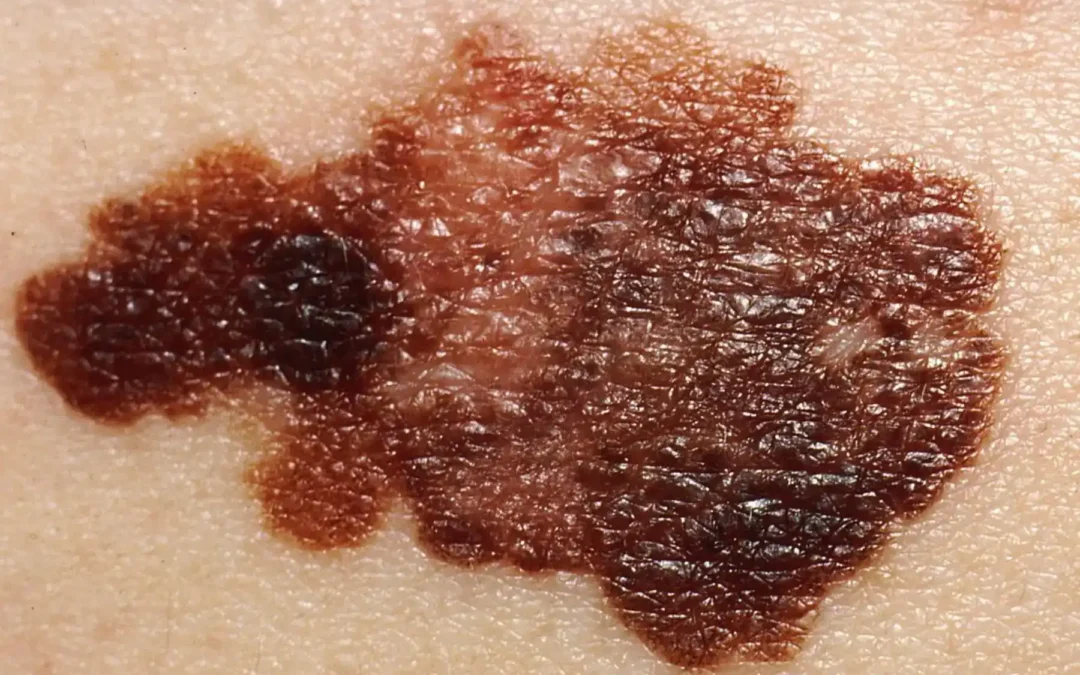
One of the most recognised tools for checking moles is the ABCDE rule, which can help identify warning signs associated with melanoma.
A – Asymmetry
If one half of the mole does not match the other half in shape or appearance, this may be worth monitoring.
B – Border
Look for edges that appear irregular, blurred, ragged, or uneven.
C – Colour
Healthy moles are often a consistent colour. Multiple shades or uneven colouring may require assessment.
D – Diameter
A mole larger than approximately 6mm can sometimes be a concern, particularly if it is changing.
E – Evolving
One of the most important signs is change. This may include:
- Growth in size
- Changes in colour or shape
- Bleeding or crusting
- Itching or irritation
- A mole becoming raised when it was previously flat

It’s also important to watch for any completely new lesions that look different from your other moles.
Our downloadable guide includes a more detailed breakdown of these warning signs, along with practical tips for tracking changes over time.
How Often Should You Check Your Skin?
For most people, performing a full skin check approximately once a month is a sensible routine. This allows you to become familiar with your skin without making it difficult to notice gradual changes.
You may need to be particularly vigilant if you:
- Have a personal or family history of skin cancer
- Have many moles or atypical moles
- Have fair skin or burn easily
- Have had significant sun exposure over the years
- Use sunbeds or have used them in the past
Consistency is key. Small changes can be easier to identify when you regularly monitor your skin.

Areas People Commonly Forget to Check
Some of the most overlooked areas can also be important to monitor. During your at-home mole check, don’t forget to examine:
- Your scalp
- Behind the ears
- The back of the neck
- Soles of the feet
- Between the toes
- Under nails
- Your back and shoulders
- Areas not regularly exposed to sunlight
Using mirrors or asking a partner or family member to help can make checking these areas easier.

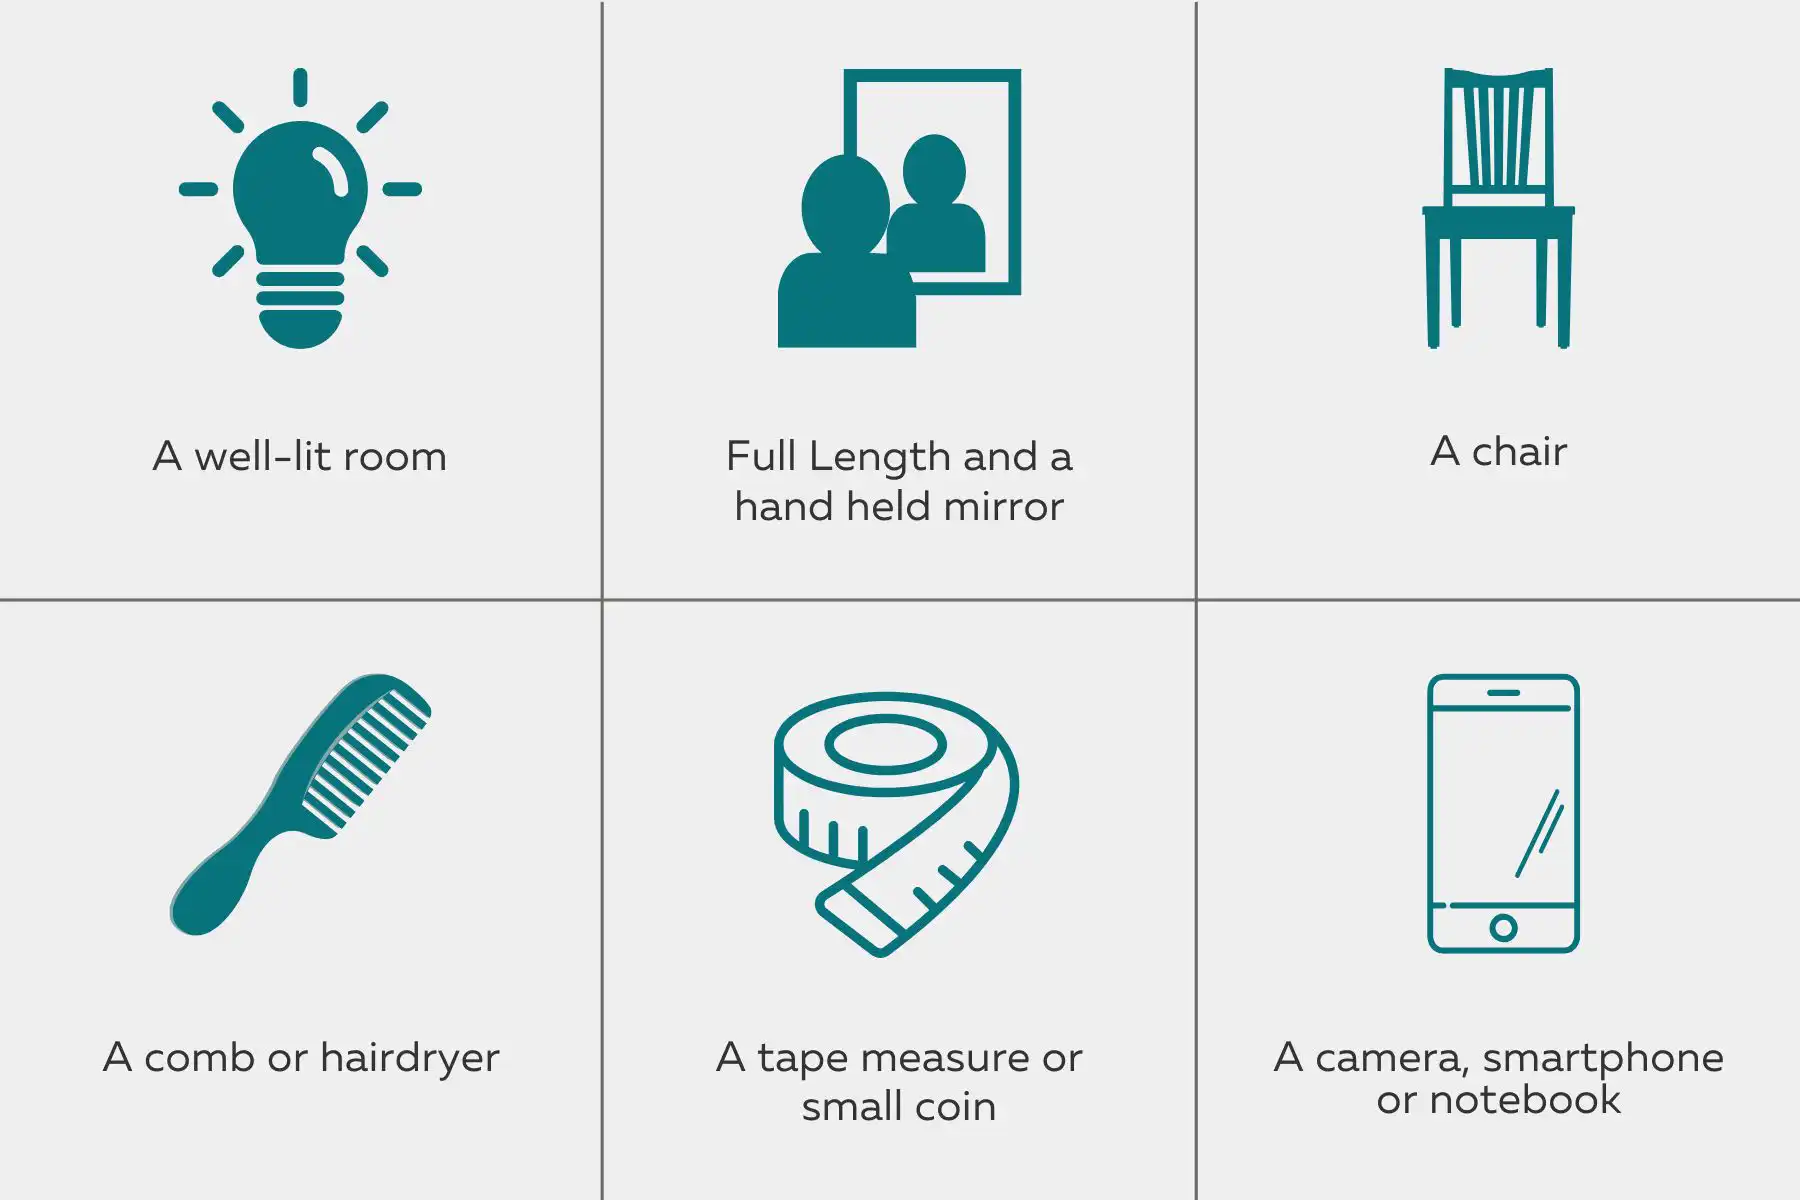
Tips for Performing an At-Home Mole Check
A proper mole check doesn’t need to be complicated. A few simple habits can make monitoring your skin much easier:
- Check your skin in a well-lit room
- Use both a full-length mirror and hand mirror
- Take photographs to track changes over time
- Keep notes of any moles you are monitoring
- Look for anything new, changing, or unusual
Our free At-Home Mole Check Guide includes a structured step-by-step process to help you check your skin more confidently at home.

When Should You Book a Professional Mole Check?
If you notice any concerning changes, it’s important not to ignore them. While many moles are harmless, changes should always be assessed appropriately.
You should consider booking a professional mole check if you notice:
- A mole changing in size, shape, or colour
- Bleeding, crusting, or non-healing areas
- A lesion that looks different from your other moles
- Persistent itching or irritation
- A new and unusual skin lesion
For more information on skin cancer warning signs, click here to read our blog on Skin Cancer Signs and Symptoms.
At Freyja Medical, our mole checks are carried out by experienced dermatology professionals with NHS roots and extensive experience assessing a wide range of skin concerns.
Download Our Free At-Home Mole Check Guide
Want a more detailed step-by-step guide to checking your skin at home?
Our free downloadable At-Home Mole Check Guide has been created by our dermatology-led team to help you:
- Understand what changes to look for
- Monitor your moles more confidently
- Build regular skin check habits
- Know when to seek professional advice
Click here to download your free guide.
Booking a Professional Mole Check
If you have concerns about a mole or skin lesion, or would like reassurance from an expert team, you can also book a professional mole check consultation with Freyja Medical.
